8 Min Read
How To Teach A Dog To Shake Hands

Key takeaway

Why pet owners are switching to online vet care with Dutch
-
Prescriptions delivered free to you
-
Fast access to Licensed Vets over video
-
Unlimited video visits and follow-ups
There’s nothing more impressive than a dog who can swiftly follow commands. They lie down as soon as you utter the words and shake their paw the second you extend your hand. Teaching your pup these tips and tricks is a fun way to impress all your friends and prove to them that you have the best dog around.
However, training your dog to actually follow these commands isn’t always so easy. A dog isn’t born just knowing how to lie down and shake your hand when you ask them to – you have to teach them.
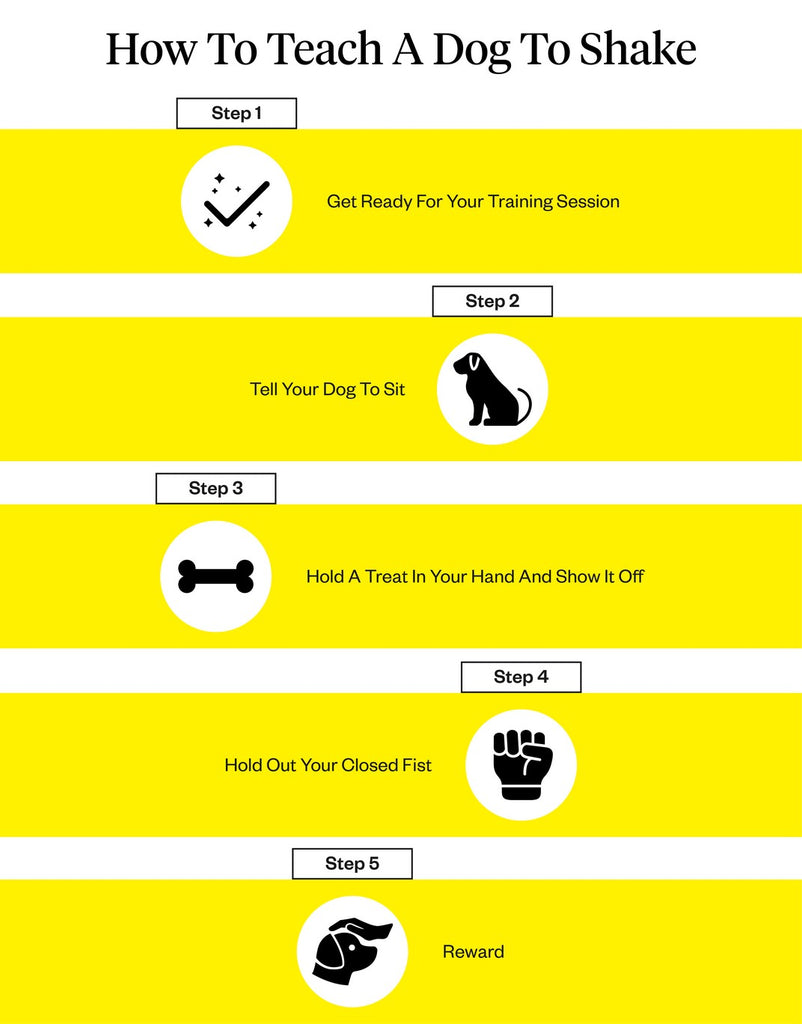
But how do you teach a dog to shake a paw? We’ll be discussing that, and more, below. In this blog post, we’ll break down how to teach a dog to shake into 5 simple steps, so that your pup can get the hang of it as quickly as possible.
- Step 1: Get Ready For Your Training Session
- Step 2: Tell Your Dog To Sit
- Step 3: Hold A Treat In Your Hand And Show It Off
- Step 4: Hold Out Your Closed Fist
- Step 5: Reward
- Teaching A Dog To Shake: Frequently Asked Questions
- Final Notes
Step 1: Get Ready For Your Training Session
The first step in learning how to teach a dog to shake hands is preparing them for their training session. All you really need to start training is your dog, a hand, and a bag of treats to reward them for their performance.
This exercise starts with the sitting command, so make sure your dog has this down pat before you move on to shaking hands. Teaching your dog to shake is most commonly done with mark and reward training1, which is a form of positive reinforcement.
Positive reinforcement is the practice of rewarding your dog for positive behaviors. Having treats is crucial when you start off training a dog, as dogs tend to repeat actions that get them what they want. For example, if your dog knows that every time they shake hands, they’ll be rewarded with a treat, they’ll be more likely to do it.
But once you’ve successfully trained your dog to associate a specific action with a treat, you can move on to a clicker. A clicker is a tool that you can use to mark positive performance the moment it happens. Mark and reward training involves using your clicker to “mark” when your dog has done something good. The clicking sound that the clicker makes tells your dog that what they did was correct. So if you’re teaching your dog to shake, you’d hit the clicker as soon as they successfully shake your hand.
Mark and reward training is a good way to train your dog as it improves your communication and strengthens your bond with your pup. But the ultimate goal of this training is to transition to intermittent or variable reinforcement, meaning your dog doesn’t always get a treat after doing something good, but sometimes they do. Just remember, practice makes perfect. Your pup won’t be able to shake hands successfully overnight.
Step 2: Tell Your Dog To Sit
You can’t teach your dog to shake until they know how to sit. Sitting and shaking are two different commands that must be taught separately. If your dog doesn’t know how to sit reliably, take some time to go through the sitting command with them again. Once your pup can sit on command, then you can move on to teaching them to shake.
Step 3: Hold A Treat In Your Hand And Show It Off
After your dog is sitting down, you’ll want to make them aware that there’s a treat in your hand. You’ll want to show off the treat, but not give it to them. As soon as your dog sees the treat in your hand, close your fist. If your dog is having a hard time identifying the treat, you can bring it closer to their nose until they see it. And if your dog is not food responsive, you can also use things like a tennis ball or their favorite toy. Just choose something that will get their attention.
It’s crucial during this step to not let your dog get the treat out of your hand, as that will send mixed signals during the training process. They might be tempted to jump up to grab the food, but try your best to keep it out of their reach by closing your fist as soon as they see the food in your hand.
Step 4: Hold Out Your Closed Fist
So now that your dog is aware that there is a treat in your fist, you’ll want to hold out your closed fist at your dog’s chest level and say “shake”, “paw”, or “high 5”, whatever you prefer, just keep it consistent. Because your dog knows that food is in your hand, they should naturally paw at your hand in an attempt to get it. They may also sniff or lick your hand.
For most dogs, it will take some time before they successfully paw at your hand when you reach out your closed fist. If this is your case, you’ll want to mark and reward (like discussed above) any paw movement. You can also try holding the treat above their head, which will get them leaning up and putting all their weight onto one paw as they go up for the treat.
Another way you can try this is by getting your dog on the ground and holding the treat out in front of them. Once they’re in the down position on the ground, you’ll want to move your hand back and forth in front of them until they paw at your hand.
Step 5: Reward
As soon as your dog has successfully pawed your hand, you’ll want to immediately reward them with a treat and positive vocalization. Most pet parents will go with “yes” instead of phrases like, “good job”, “good boy”, “good girl”, or “good dog”, which are often used outside of training and may lead to some confusion for your pet. Rewarding them is key so that they begin to associate this behavior with a treat. They’ll begin to understand that whenever they successfully paw at your hand, they’ll get a treat, and they’ll start to do it more easily.
You’ll want to continue this exercise for 1-2 minutes several times a day until your dog starts to get the hang of it. Over time, you can begin to phase out the treat and have your dog start responding to the command, rather than the treat.
When you progress to Once your dog is consistently pawing at your hand when you extend it, add a command when you know they’re about to paw. Make sure you say it loudly and clearly enough for your pup to hear. Also, once you pick a command to say, don’t change it, as this will just confuse your dog. So for example, if your command is “shake”, don’t say “paw” one day. Short, one-word commands tend to work best for dogs.
Teaching A Dog To Shake: Frequently Asked Questions
What’s the easiest way to teach a dog to shake?
There are several different ways to approach teaching a dog to shake, whether your dog is food-motivated or otherwise. Every dog is different, so if one method isn’t working for you after several tries, consider using a different approach, such as luring. Some people find that using treats to motivate their dog is the easiest way to train them to shake, but others have better luck with toys.
How long does it take to teach a dog to shake?
Every dog is different– it can take one dog just a couple of training sessions, and another, multiple weeks. At the end of the day, consistency is key, and your dog will get the hang of it as long as you keep practicing with them. Implement regular 1-2 minute training sessions throughout the day, and your pup will be shaking hands before you know it.
Should you teach your dog to shake?
So now that you know how to teach a dog to shake a paw, you’re probably wondering why you should teach them to do this.
Teaching your dog to shake is a great way to engage with your dog, build a strong bond, and challenge them to try new tricks. Training a dog to do tricks can improve their confidence and provide mental stimulation that they can’t get in other ways. Mental stimulation is just as important to a dog as physical exercise is, and teaching them tricks is a great way to achieve that. In fact, dogs with anxiety can especially benefit from training as it provides a sense of accomplishment.

Final Notes
Having a dog that can quickly and easily do tricks on command is every dog owner’s dream. Not only is it just impressive to have a dog that can do tricks, but it’s also great for their well-being. Tricks, like shaking hands, keeps your dog mentally stimulated and strengthens your bond with them. It keeps us close to our furry friends and gives us a way to communicate with them.
If your dog suffers from anxiety or other behavioral issues that may be hindering their ability to learn tricks, it’s a good idea to bring them to the vet. A vet will help you understand the root cause of your dog’s behavior issues and how you can go about helping them. And if you need help making an appointment with a vet, you can use Dutch.com
Dutch is a convenient way for pet owners to get connected with licensed veterinarians online. Dutch works with a host of vets who are qualified to help with anything from treating dog anxiety to teaching you how to train your dog to stop barking.
Share
References
-
Stephanie Gibeault, MSc. “Clicker Training: Learn about Mark & Reward Dog Training Using Clickers.” American Kennel Club, American Kennel Club, 14 Dec. 2021, https://www.akc.org/expert-advice/training/clicker-training-your-dog-mark-and-reward/.